Image Editing Prompts That Preserve Identity: Templates and Examples
Copy-ready image editing prompt templates, before-and-after examples, and failure cases for keeping faces, products, characters, and rooms consistent.
The hard part of prompt-based image editing is not asking for a new outfit, background, lighting style, or product scene. The hard part is getting the model to change that one thing without quietly replacing the face, product shape, pose, camera angle, or room layout.
A strong identity-preserving edit prompt has two jobs: first it names the invariant, then it describes the change. The examples below use MagicPixels text-to-image to create a source image, then image-to-image to test edit prompts against that same source.
Copy-ready prompt templates
Use these as starting points, then replace the bracketed details with the exact traits and edit target from your image.
Preserve the same [subject], [identity details], [pose], [camera angle], and [composition]. Change only [target edit] to [specific result]. Keep [important constraints] unchanged.
Preserve the same face, hair, eye color, expression, pose, and camera framing. Change only the outfit to [new outfit] and the background to [new background]. Keep the person recognizable.
Preserve the exact product shape, color, material, proportions, logo placement, and camera angle. Change only the environment to [new scene] with [lighting style].
Preserve the room layout, furniture positions, window placement, wall shape, and camera angle. Change the decor style to [new style] with [new palette or lighting].
Start by naming what must not change
Identity preservation starts with the invariant. For a person, that can mean face shape, hairstyle, eye color, freckles, expression, pose, and framing. For a product, it can mean geometry, material, hinge placement, logo-free surfaces, and the exact camera angle. For an interior, it can mean the layout, window position, furniture placement, and perspective.
Put those constraints before the creative direction. If the prompt starts with the new style, the model may optimize for the new style and treat the original source as loose inspiration.
Then make one clear edit
The most reliable image-to-image prompts are narrow. Ask for one meaningful transformation: change the outfit, change the background, relight the scene, restyle the room, or move a product into a new environment.
If you need several changes, run them as a sequence. Generate the strongest edit first, then use that result as the source image for the next prompt.
Use concrete visual language
Words like better, cooler, premium, viral, and cinematic are too elastic on their own. They can work as supporting adjectives, but they should not carry the whole edit.
Concrete details give the model a smaller target: cream knit sweater, warm cafe interior, soft window light, dark green and brass decor, laptop blurred in the background, or soft cinematic side light.
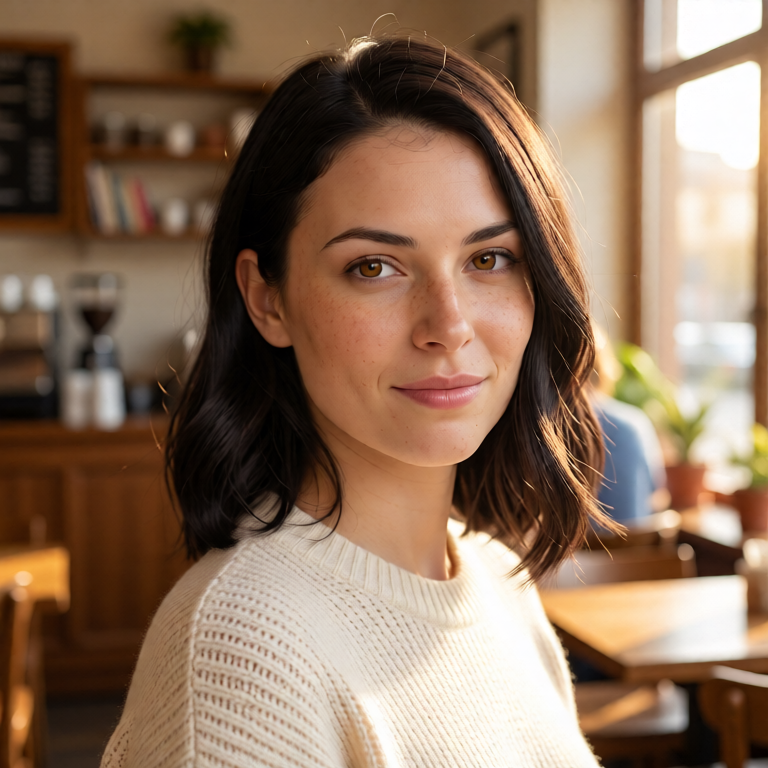
Portrait identity: change outfit and background
This prompt keeps the same fictional person while changing wardrobe and scene. It works because the invariant is explicit before the edit request.
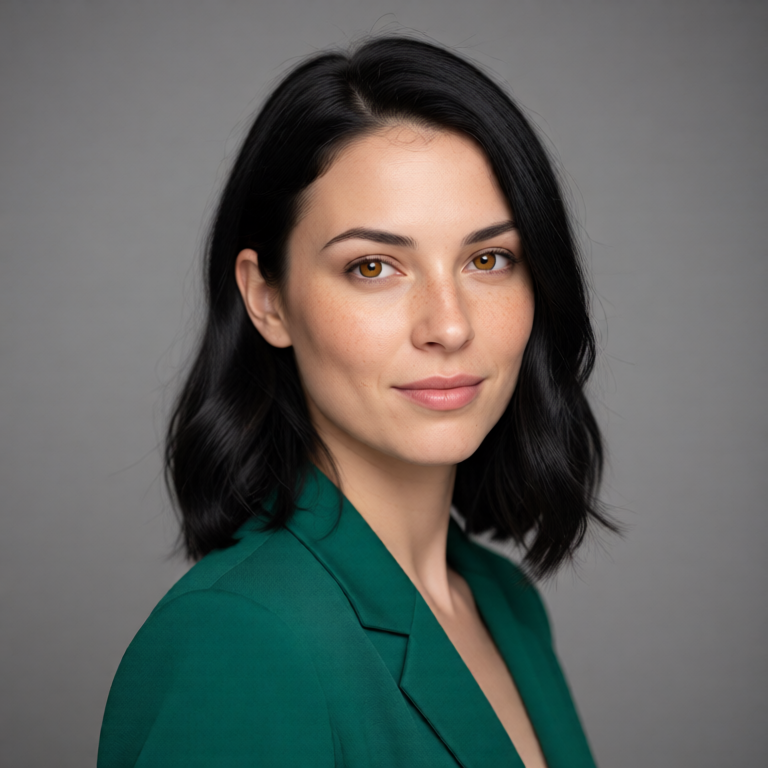
Editorial studio portrait of a fictional woman with shoulder-length black hair, soft freckles, amber eyes, a forest green blazer, neutral gray background, realistic lighting, 85mm lens, calm confident expression
Preserve the same face, freckles, hair length, eye color, pose, camera angle, and expression. Change only the outfit to a cream knit sweater and the background to a warm cafe interior with soft window light.
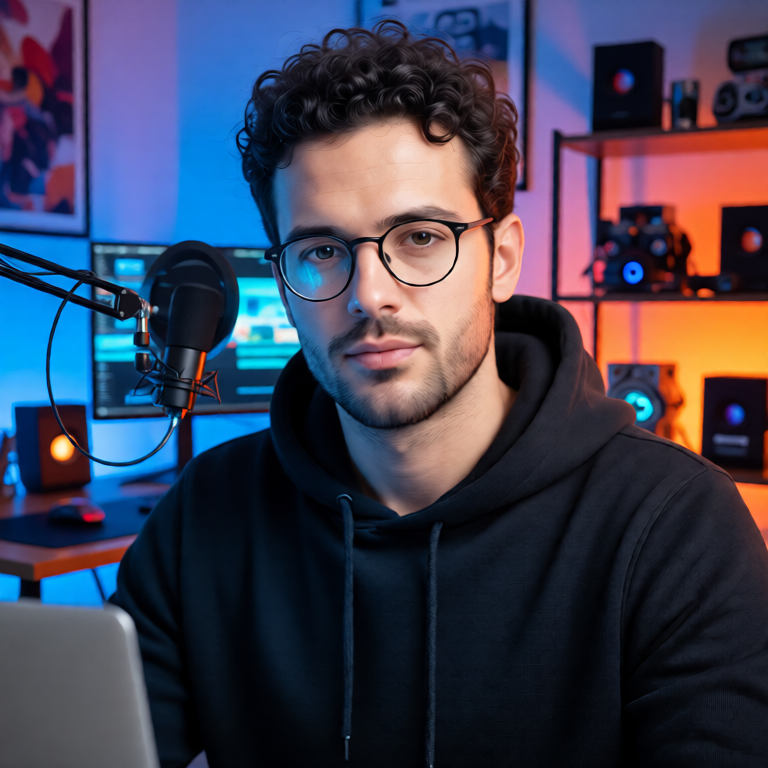
Creator thumbnail: preserve the person, upgrade the scene
For thumbnails and profile content, preserve face, glasses, hair, beard, and framing before asking for a higher-energy studio environment.
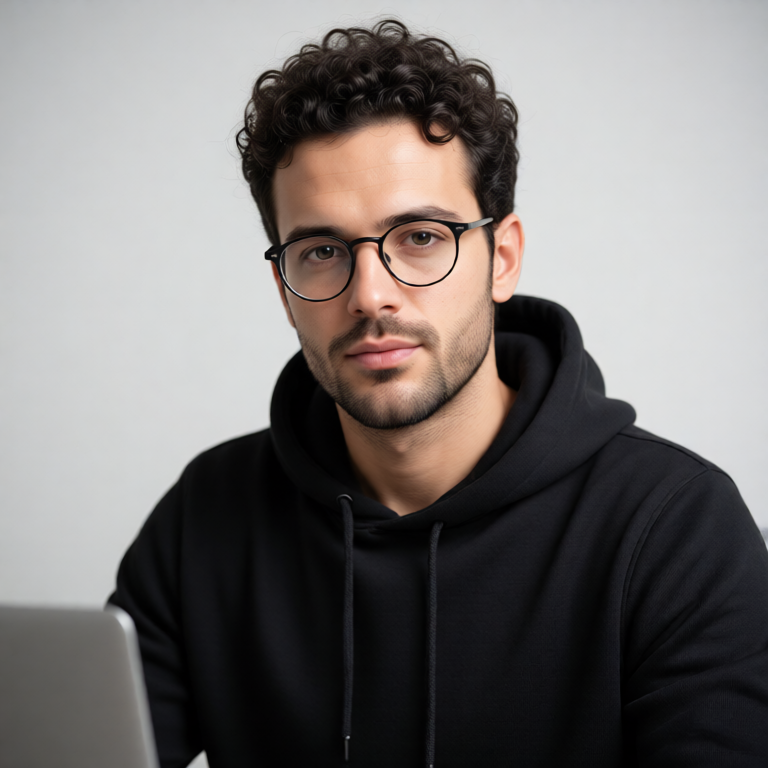
Realistic creator thumbnail portrait of a fictional man with curly dark hair, trimmed beard, round glasses, black hoodie, seated at a desk with a laptop, clean studio lighting, sharp focus
Keep the same person, face shape, beard, glasses, hairstyle, desk position, and camera framing. Change the scene into a colorful YouTube-style tech studio with blue and orange lighting. Make it more clickable but still realistic.
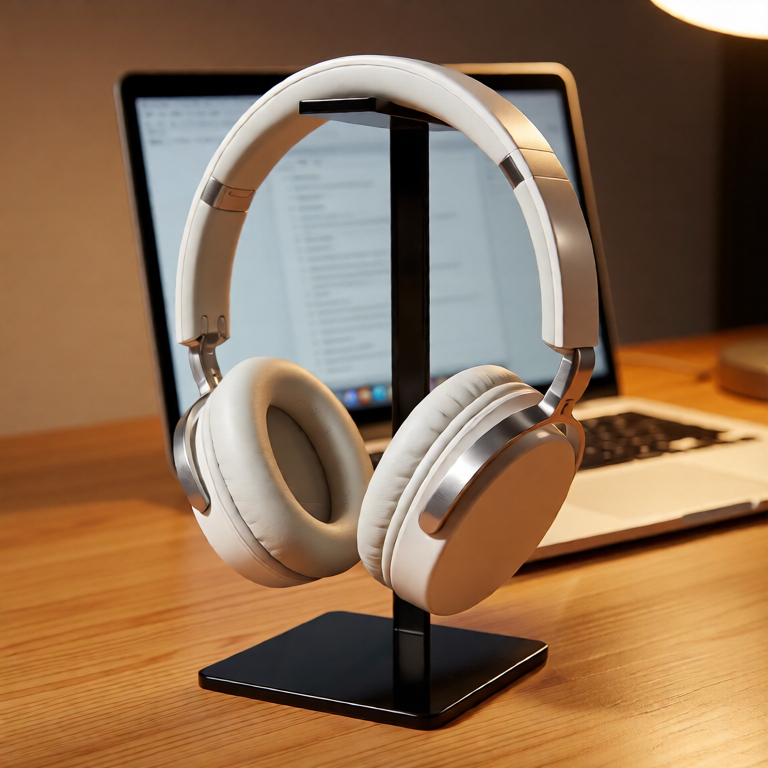
Product consistency: keep the object geometry
Product edits need stricter constraints than portraits. Name shape, hinges, stand, material, and camera angle so the environment can change without redesigning the product.
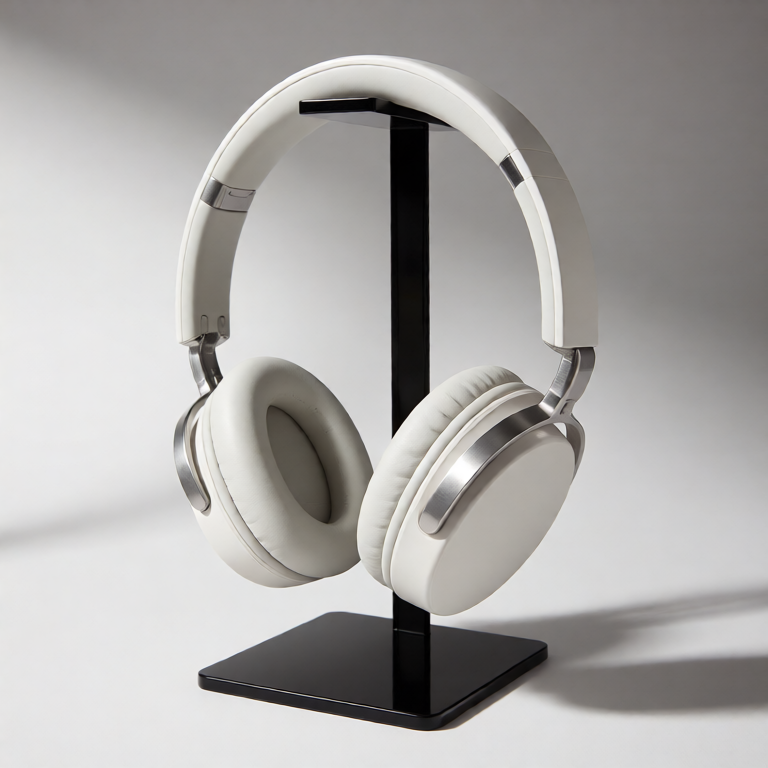
Minimal product photo of matte white wireless headphones on a black acrylic stand, logo-free design, oval ear cups, brushed metal hinge, soft shadow, clean white background, commercial photography
Preserve the exact headphone shape, ear cups, hinge design, stand position, and camera angle. Change only the environment to a warm wooden desk with a laptop blurred in the background, premium product ad lighting.
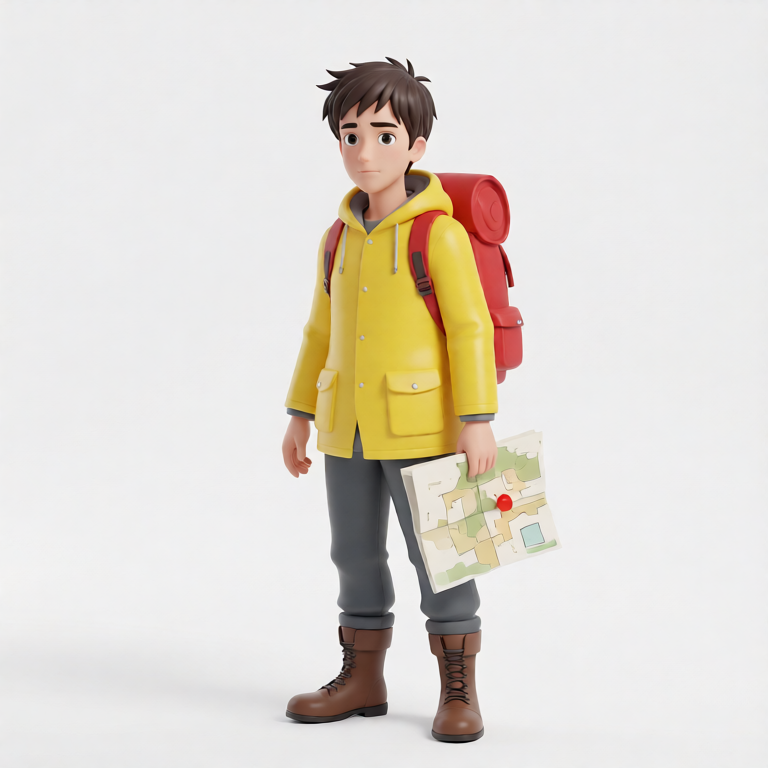
Character style transfer: preserve the design
When changing style, list the character design details that must survive the translation. Otherwise style transfer can replace the character instead of restyling it.
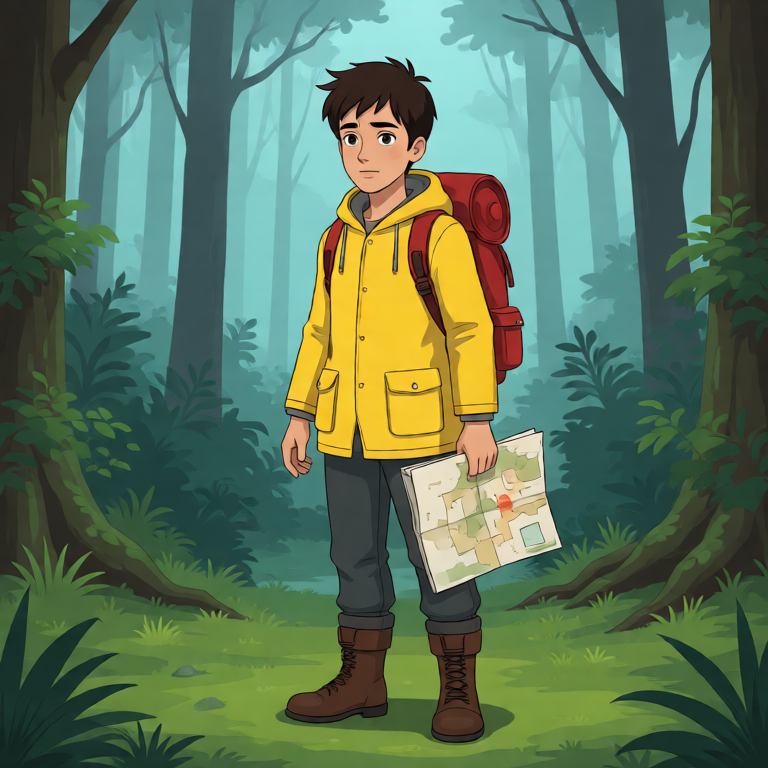
Full-body character concept of a fictional young explorer wearing a yellow rain jacket, brown boots, red backpack, holding a folded map, standing in a misty forest, animated film style
Keep the same character, yellow rain jacket, red backpack, boots, pose, and map. Change the style to a clean 3D toy-like render with softer shapes and a bright studio background. Preserve the character design.
Room redesign: preserve layout and camera angle
Interior edits are most useful when the room stays measurable. Preserve layout and camera angle before changing the decor style.
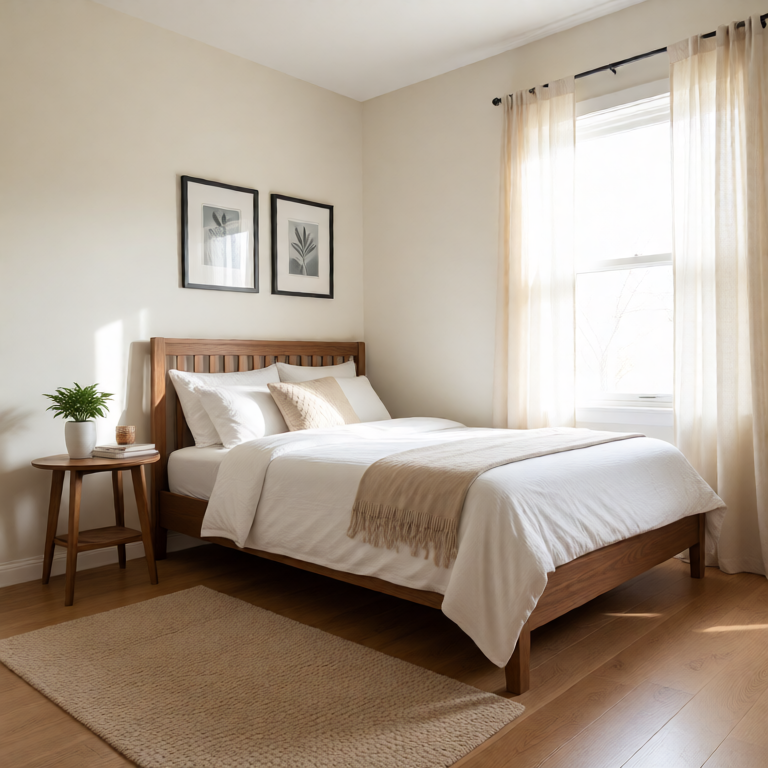
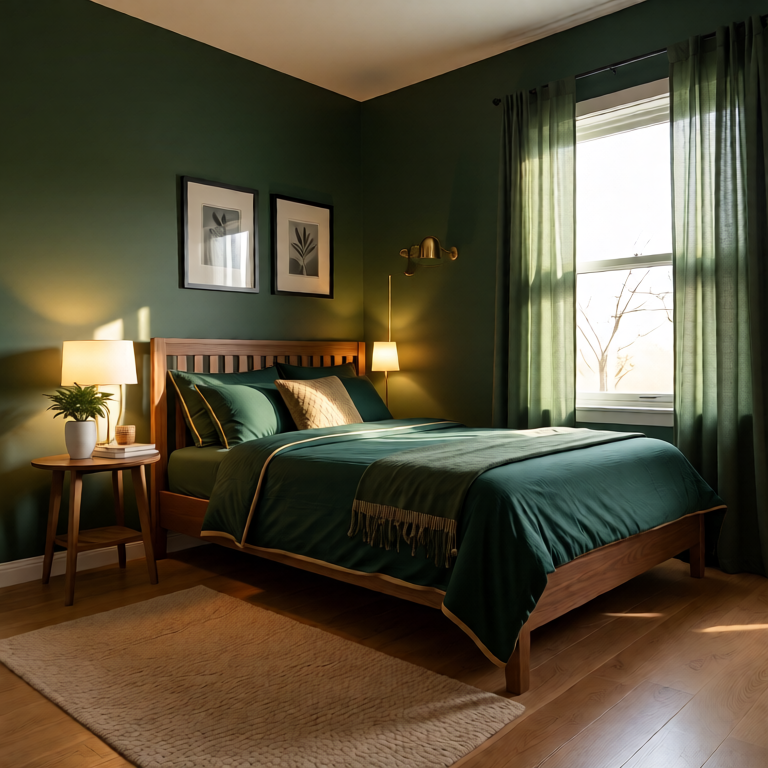
Cozy small bedroom with a walnut bed frame, white bedding, two framed prints above the bed, round side table, beige rug, morning light through sheer curtains, realistic interior photo
Preserve the same room layout, bed position, window, side table, rug placement, and camera angle. Change the decor to a modern dark green and brass style with richer bedding and warmer evening lighting.
Failure case: vague edit vs specific edit
A vague prompt can still make a good-looking image, but it gives the model permission to reinterpret too much. The specific version controls the subject, clothing, pose, and wall before asking for lighting changes.
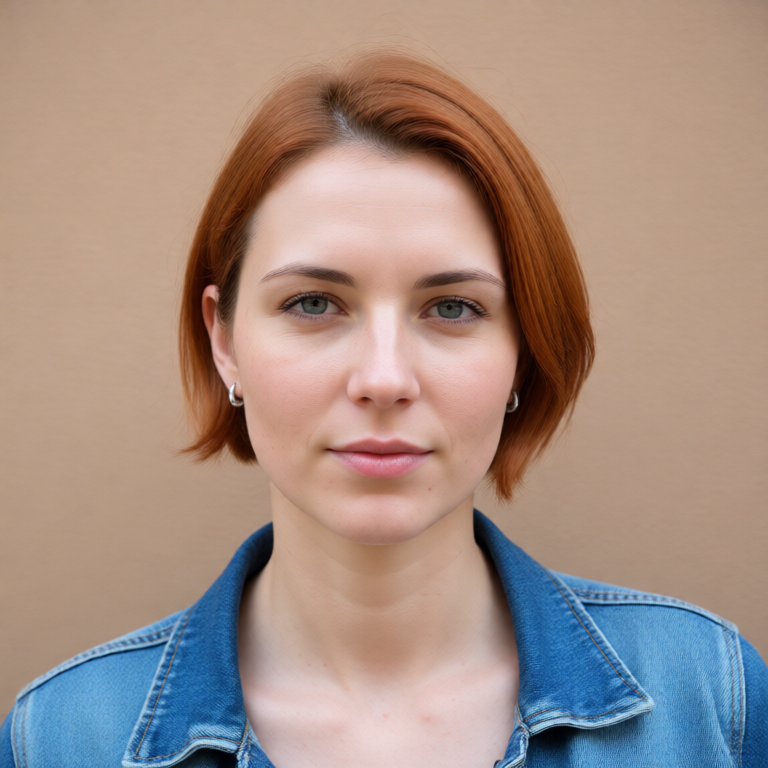
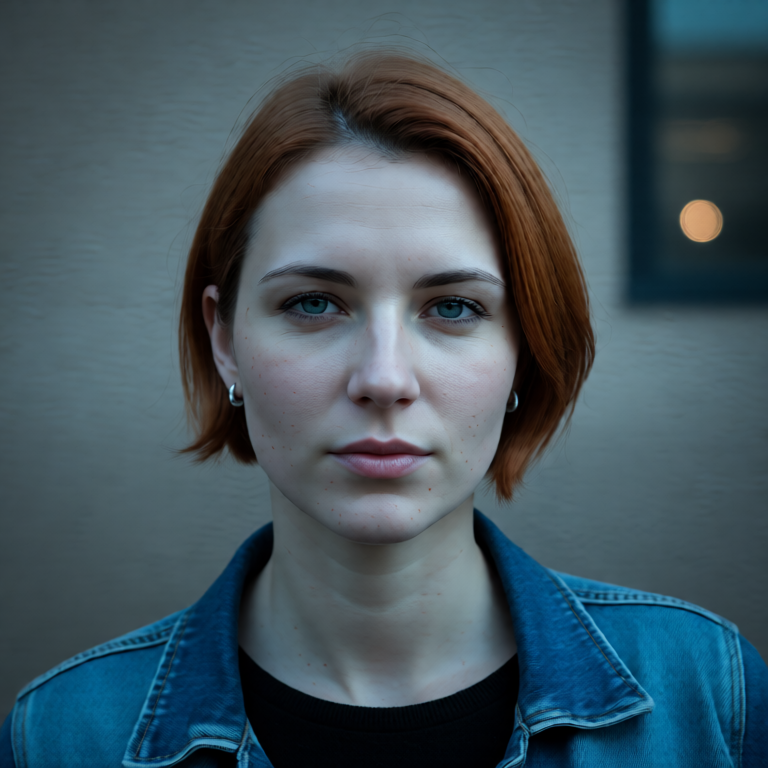
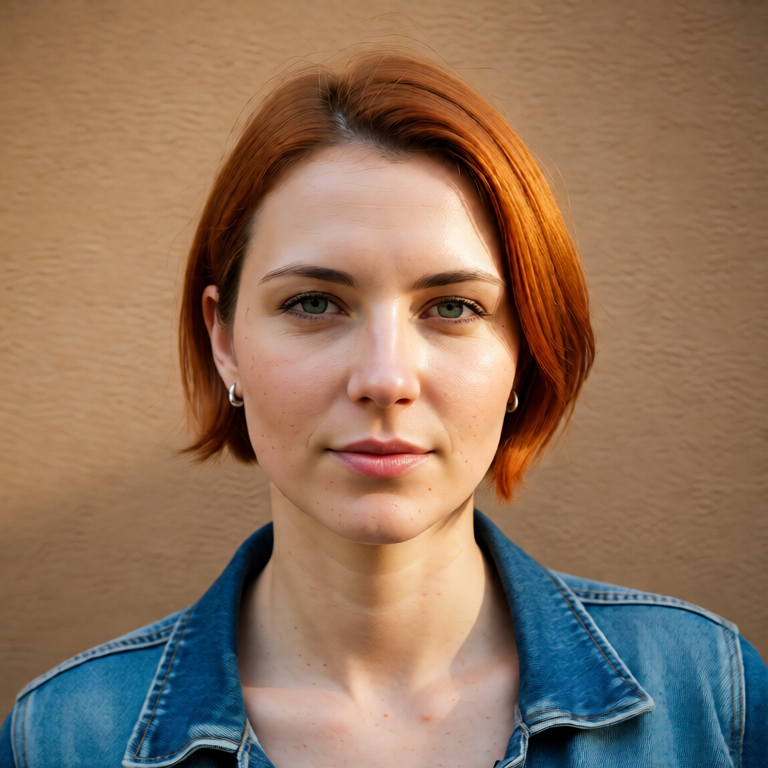
Realistic portrait of a fictional woman with a short copper bob haircut, blue denim jacket, small silver earrings, standing against a plain tan wall, natural daylight
Bad prompt: Make her look cooler and more cinematic. Better prompt: Preserve the same face, copper bob haircut, earrings, denim jacket, pose, and tan wall background. Improve only the lighting: add soft cinematic side light, gentle contrast, and a subtle film-photo look.
Identity-preserving prompt checklist
- Name the subject or object that must remain recognizable.
- List the concrete details that define identity: face, hair, product geometry, room layout, pose, and camera angle.
- Use the phrase change only when the edit should be narrow.
- Describe the new visual result with specific nouns and lighting terms.
- Run separate edits for separate goals instead of packing every change into one prompt.
- Compare the output against the source before continuing into the next edit.
FAQ
What is an identity-preserving image edit?
It is an image-to-image edit where the important subject stays recognizable while a controlled detail changes, such as outfit, background, lighting, style, room decor, or product environment.
How do I write a prompt that keeps the same face?
Start by naming the face details to preserve: face shape, hairstyle, eye color, expression, pose, and camera framing. Then describe the single change you want.
Why did my AI image edit change the person or product?
The prompt probably emphasized the new style more than the invariant. Put preservation instructions first and make the requested change narrower.
Should I edit everything in one prompt?
Usually no. For better control, make one strong edit, inspect it, then use that result as the source for the next edit.